

The Best Reference Manager Setup
(Zotero + ZotFile + Cloud Storage)
This article was originally published by Stephen Chignell on Research Gate.
Introduction
This tutorial is the result of a couple of years of trying different software packages and reference manager setups. After some trial and error, I’ve settled on a system that is smooth, efficient, and free. The key is to use Zotero in conjunction with a cloud-based storage service. With this setup you will be able to:
- Download, rename, and organize academic papers, news articles, web sites, and other reference material with one click.
- Have virtually unlimited storage for your PDFs with automatic back up.
- Extract highlighted text and annotations from PDFs and associate them with references
- Search and insert references within a Word document and automatically insert a reference list in the required formatting style of virtually any journal.
- Create multiple libraries that you can share with collaborators and/or the public
Why Zotero?
- Free and open source
- Powerful and flexible
- Active user community
PART 0: Switching to Zotero
Many people may be in a situation where they have already invested a lot of time and money into a proprietary reference manager such as EndNote or Mendeley. I used Mendeley for a couple of years before it was bought by Elsevier, who have since moved toward commercializing the software.
As far as I know, there are three options for migrating your existing reference library over to Zotero:
- Exporting your references from EndNote or Mendeley into Zotero is very easy. There are instructions for exporting from EndNote (here and here) and Mendeley (here and here).
- Exporting your references and PDFs might be a little more work, but shouldn’t be too difficult.
- Exporting your references, PDFs, subfolders, and annotations is a bit more challenging, but is definitely possible. I think Menotexport is probably the best way to do this from Mendeley, but there are other options out there as well.
- Note that as of June 16, 2018, the Beta version of Zotero includes the ability to import directly from Mendeley. However, Mendeley Desktop 1.19 has moved toward encrypting their database, so if you have already updated, you will have to follow the workaround in the above link to revert to an older version.
- When doing a large import, Zotero may try to automatically find the associated metadata for each paper via Google Scholar. However, after a couple hundred of requests, Google will suspect you are a bot and automatically put up a CAPTCHA, which may slow or stop the import process. To avoid this, simply disable your internet connection during the bulk import; you can always go back and tell Zotero to look up citation information for specific files later.
While I’m pretty confident in this setup, I recommend going through the rest of this tutorial and trying out Zotero before doing any migrations, just to make sure you like it.
PART 1: Install Zotero Standalone and the Zotero Connector
- Download and install Zotero Standalone AND the Zotero Connector
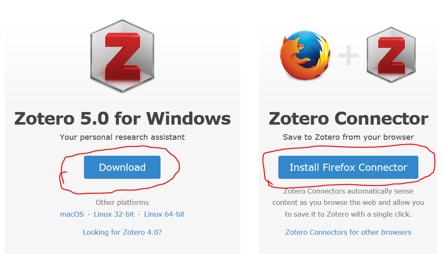
- Configure Zotero Connector within your browser
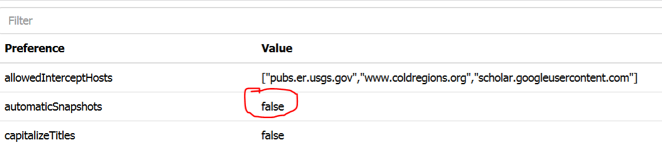
- Once installed go to Options à Config Editor
- (Optional) change the “Value” for automatic snapshots to “false” (double click)
- If you leave it to “true” you will get a copy of the web page in your Zotero library. Some people like this feature, but I prefer to only attach PDFs.
- If you leave it to “true” you will get a copy of the web page in your Zotero library. Some people like this feature, but I prefer to only attach PDFs.
PART 2: Install a cloud storage service
- Choose your service
- This could be Google Drive or Dropbox that you already have an account with.
- However, I highly recommend MEGA because it’s free, encrypted, and gives you 50GB of space (which is essentially unlimited as far as PDFs go)
- Download the relevant desktop sync app (e.g., MEGASync)
- Create a new folder in the syncing folder. This is where your PDFs will be stored, so you might want to give it an appropriate name like “Zotero” or “Zotero_Library” (see below)

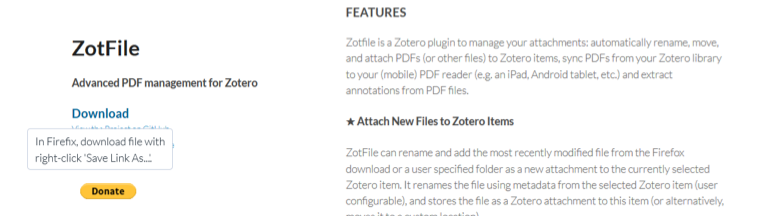
PART 3: Install and configure Zotfile
Zotfile is an excellent add-on for Zotero that helps to manage your PDFs. It can automatically rename, organize, and extract annotations.
- Visit the Zotfile site and download the xpi file (save as…in a folder you can find)
- In Zotero Standalone, go to Tools --> Add-ons
- Click the gear icon and click “Install add-on from file”
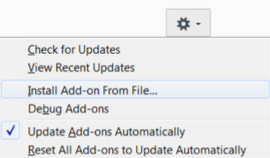
- Navigate to and select the .xpi file for ZotFile that you downloaded
- ZotFile should be installed, but you may need to restart Zotero
Setting up PDF syncing
Once Zotfile is installed, go into Zotero Standalone, select “Tools” from the top menu bar, and click ZotFile preferences (you may need to restart Zotero first).
- Go to the General Settings tab (see below)
- Set Source Folder for Attaching New Files to the desired folder
- When you add a reference to Zotero, Zotfile will look to this folder for new PDFs to associate it with
- Your “Downloads” folder is a good option (this is what I use)
- Some people might prefer to use a separate folder as holding tank (e.g. a folder on the desktop called “Papers for Zotero”)
- Set Location of Files to “Custom Location” and point it to the folder you created in your cloud syncing app in Part 2.
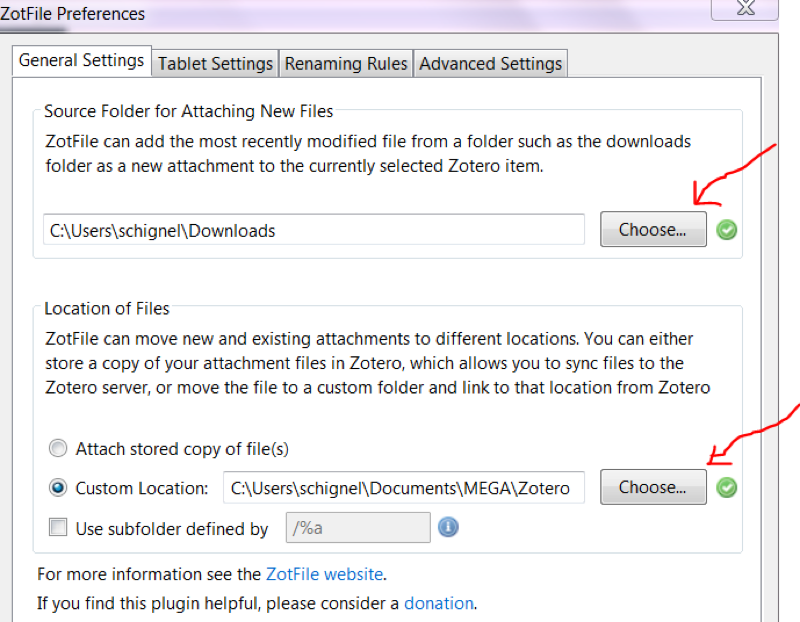
If you leave Use subfolder defined by unchecked, you will get a single folder on the sync drive with all of your PDFs in it.
Alternatively, you can check this box to instruct ZotFile to organize your PDFs into subfolders by author name, year, journal name, etc. (see the ZotFile website for more info).
Personally, I find it more useful to leave it unchecked so all of my PDFs are put in one big folder on the sync drive (below).
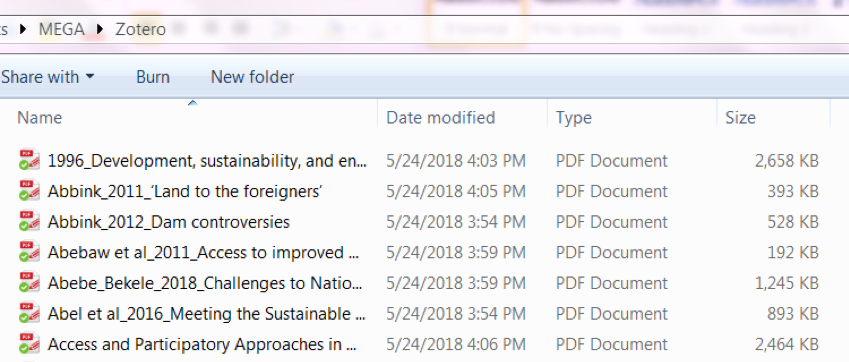
I then make subfolders within Zotero Standalone, since this is where I’ll spend most of my time navigating.
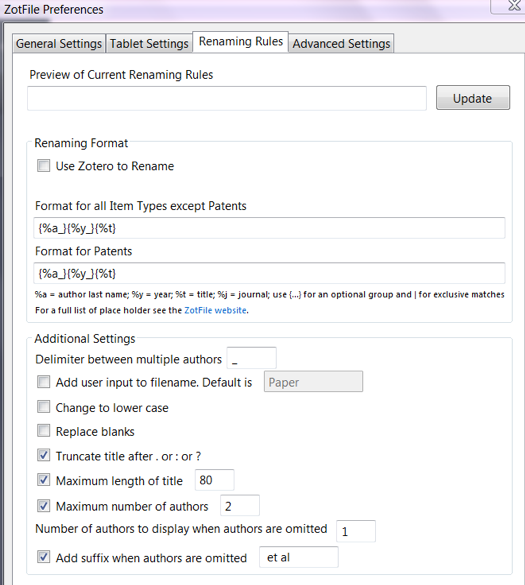
Set up renaming rules
I strongly recommend instructing ZotFile to automatically rename your PDFs. There are many options for this, but here are the settings I use as an example:
Stopping automatic syncing to Zotero Cloud
When you make a Zotero account on Zotero.org and start to sync your Zotero Standalone library with the Zotero cloud, it will default to uploading your PDFs along with your references.
However, we want to store the PDFs in “My Library” to a separate cloud service using ZotFile, so we need to change some settings before starting to sync:
- Open the Zotero Preferences
- Navigate to the Sync tab
- Under File Syncing, uncheck “Sync attachment files in My Library using Zotero”

This is the primary setting that you need to change in order to have your references sync to the Zotero cloud, while your PDF attachments sync to your personal cloud service.
As you can see from the screenshot, there are a number of other sync options that you can adjust. To learn more about syncing with Zotero, I suggest reading the documentation (here).
PART 4: Install other add-ons to Zotero Standalone
I highly recommend installing a Zotero Word Processor plugin (either for MS Word or Libre Office).
The following plugins are not required for the overarching setup to work but they will make your life easier and improve the overall experience. For any of these, just visit the plugins page and follow the steps to download and install the respective .xpi files like you did for ZotFile.
- Zotero Storage Scanner
- Google Scholar Citations for Zotero
- Zutilo
- FireTray
- Zotero QuickLook
- This should work automatically with Mac
- On Windows, you will have to install QuickLook beforehand
There are many other plugins that I have yet to try, including ones that enable integration with Google Docs and LaTeX.
I also highly recommend Unpaywall. This is not a Zotero plugin, but is added to your browser and will automatically search for open access PDFs on every journal web page you visit. If it finds an open-access PDF, Zotero will usually grab it when you click the button.
PART 5: Using Zotero
You now have everything you need to start managing your references with Zotero. Zotero has many built-in features and there are many resources online for learning about these. I’m therefore going to focus on some of the particularities of this specific setup. Let’s start with an example.
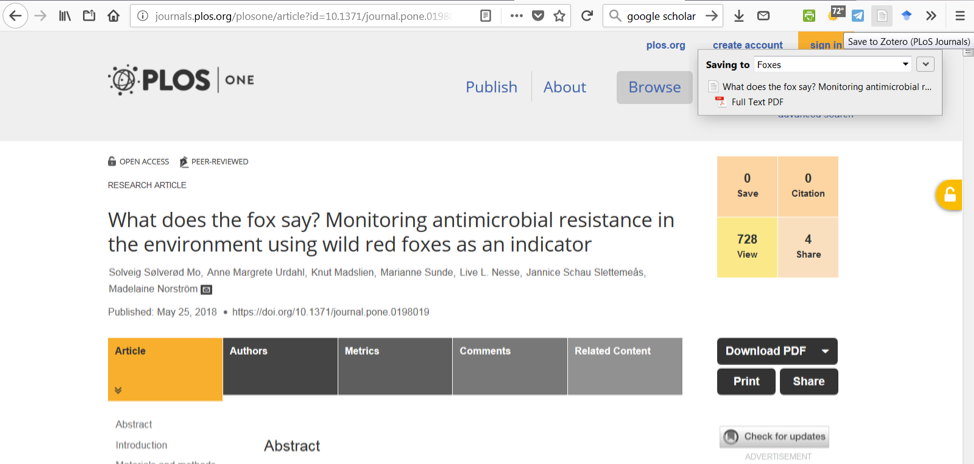
Suppose you come across a paper that you would like to download. Let’s use this PLOS ONE paper on antimicrobial resistance in foxes as an example.
The first step is to open the Zotero Standalone application. Once Zotero is open, we can go back to the browser and notice that the icon for the Zotero Connector (usually in the top-right corner of the browser window) has changed to look like a manuscript (see below).
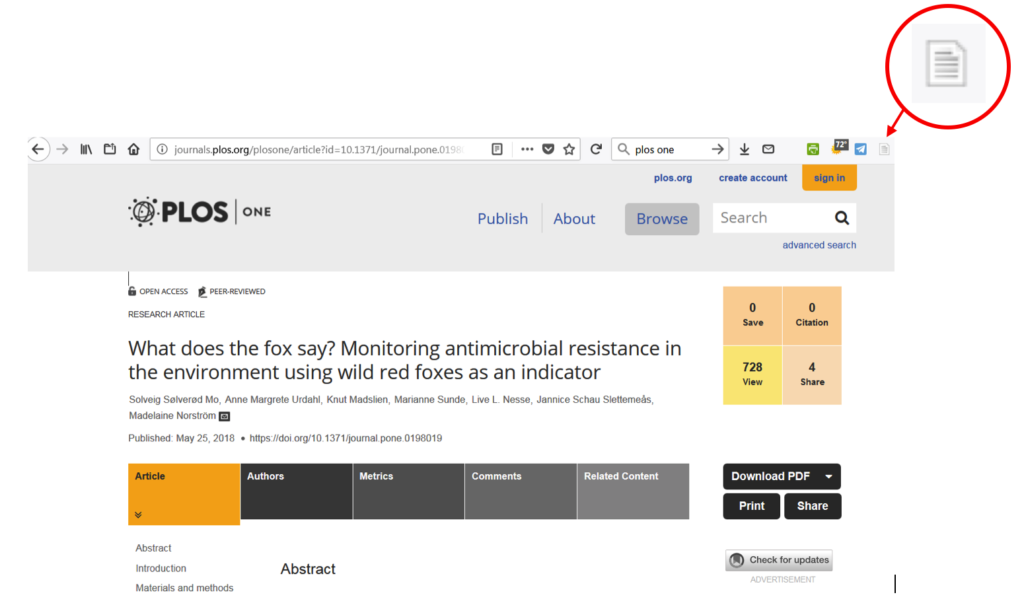
This indicates that Zotero recognizes that there is a reference on the web page and that it is a journal article.
If we were to click this button, Zotero would go to work grabbing the reference information from the page and looking for an open-access PDF to download. It would then appear in our library.
However, I want to be more organized and direct this reference to a subfolder (or “Collection”), not just my general library. So before I click the button, I’m going to go back to Zotero Standalone and click the ![]() button to create a new Collection. I’ll name it “Foxes”.
button to create a new Collection. I’ll name it “Foxes”.
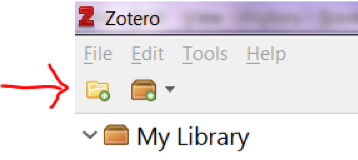
Now go back to the browser and click the Zotero button. Watch and wait in wonder as the Zotero Connector grabs the reference and the PDF, and saves it to the “Foxes” collection in Zotero Standalone.
If you switch back to Zotero Standalone you should see the reference (red arrow) and the link to the attached PDF (blue arrow). The column on the right shows the detailed metadata.
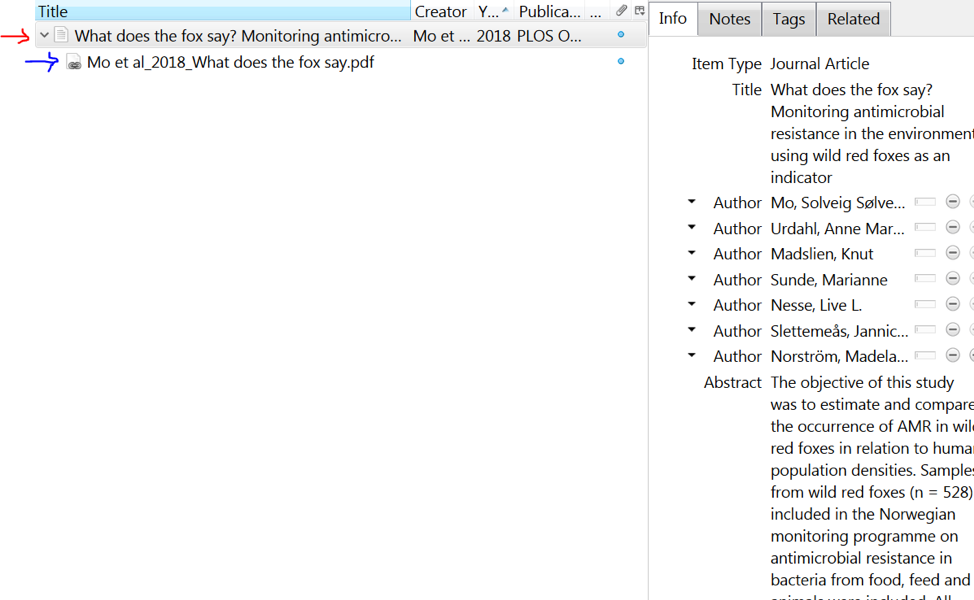
Meanwhile, in the background, ZotFile has automatically taken the PDF, renamed it, and moved it into your sync folder:

References vs. Attachments
This is an important moment to note that Zotero makes a distinction between the reference (or parent item) and the file(s) associated with it. If you wanted to, you could have a whole Zotero Library composed of references, with no PDFs at all. You can also have PDFs in Zotero that have no associated reference.
Continuing with our example, say you find this book on foxes and download the reference with the Zotero Connector.
As you can see below, Zotero has the Book reference, but no attachment. Our PLOS ONE paper, however, has a blue dot, showing it has an attachment.

Double-clicking on a reference will open the associated file in default PDF viewer (I highly recommend PDF X-Change Editor for Windows users).
I like to annotate PDFs with highlights or comments. For example, open the “Mo et al” paper and highlight the first sentence of the abstract:
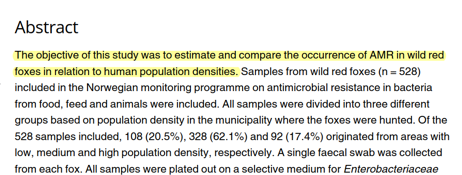
Save the changes to the PDF, and now go back to Zotero.
Right-click on the reference, and go to Manage Attachments --> Extract Annotations
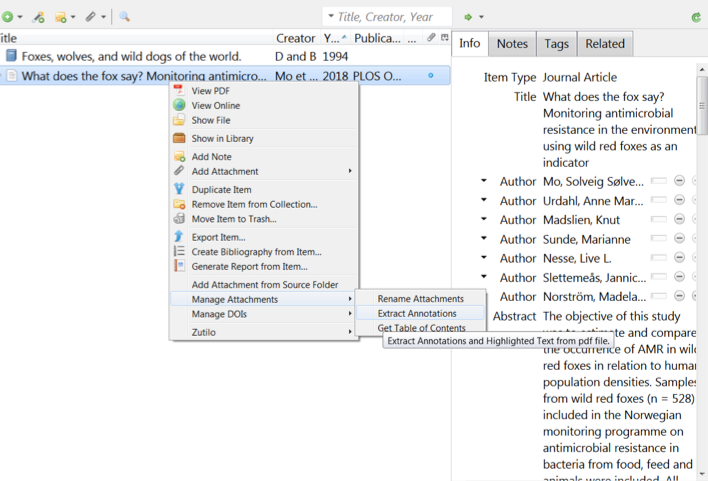
You should now see a note attached to the reference, and the extracted annotation in the right-hand column.
Clicking the blue link will take you to the relevant page in the PDF.

Hit the green arrow in the top right corner to sync your references to your Zotero Cloud (you will have to make an account first). Remember, this is only syncing the references, not the PDFs (these are being synced by your cloud service).
PART 6: Deleting
There are a number of different options for deleting, and they’re a little tricky with this setup. Usually, to delete an entry, you just right click and select “Move Item to Trash”.
However, because we are storing the PDFs outside of Zotero, moving items to the trash will only delete the reference, not the PDF. I recommend deleting the PDF first, then deleting the reference in Zotero.
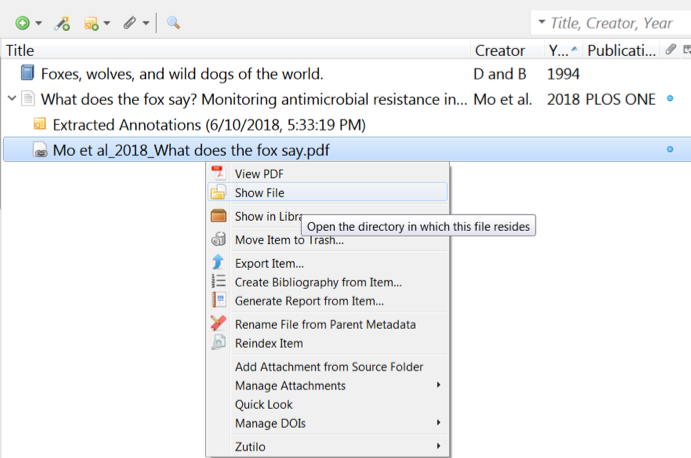
- To delete the PDF, right-click on the link to the attachment and choose “Show File”. This will open up your storage folder in a new Window where you can delete the PDF as you would any other file on your computer.
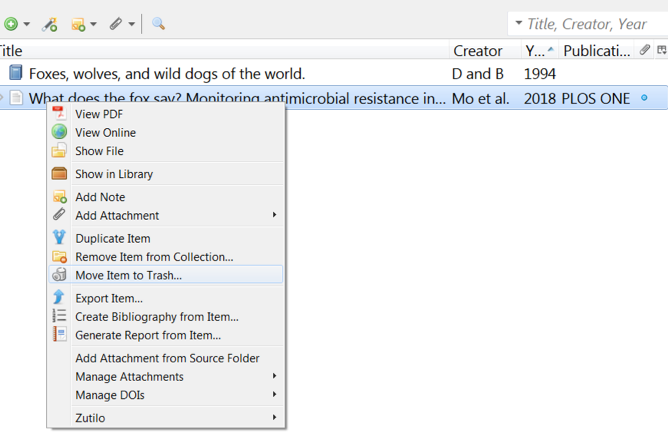
- Now that the PDF is deleted, go to Zotero, right-click on the reference, and select “Move Item to Trash”:
PART 7: Other tips
You now have the basics of downloading and managing references in Zotero! There are many other neat functions available in Zotero, and the best way to learn is to start exploring the program. The Zotero documentation and forum are also great places to start looking for tips and tricks. Here are a few functions/options that I find particularly useful:
Other ways to bring a reference into Zotero
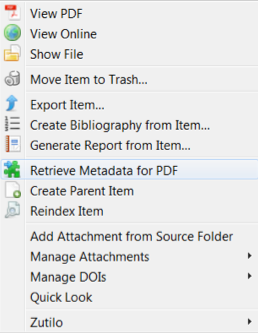
- Drag and drop a PDF into Zotero Standalone. Zotero will attempt to find the correct metadata and create a reference for it.
- Sometimes this doesn’t work, and you can right-click and say Retreive metadata for PDF.
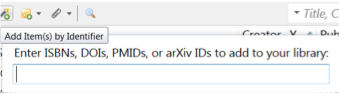
- Maybe you have a DOI but no PDF. You can click the
 tool at the top of the Zotero Standalone window, and paste a DOI or other type of identifier into it. If Zotero can find a matching record online, it will create a new reference in the library.
If you acquire the relevant PDF at a later date:
- Put it in the Downloads folder on your computer (or whichever folder you selected for Source Folder for Attaching New Files in the ZotFile settings in PART 3).
- Go to Zotero Standalone and right-click on the reference
- Select Add attachment from source folder
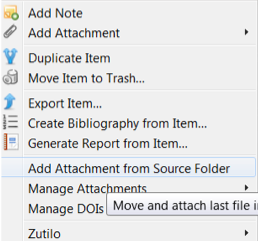
- ZotFile will grab the PDF, rename it, move it to your sync folder, and associate the reference with it in Zotero, just as if you had clicked the Zotero Connector button in your browser.
Setting up RSS Feeds
If you sign up for table of contents alerts from your favorite journals, you might consider sending them straight to Zotero via an RSS feed. Here is how to do it.
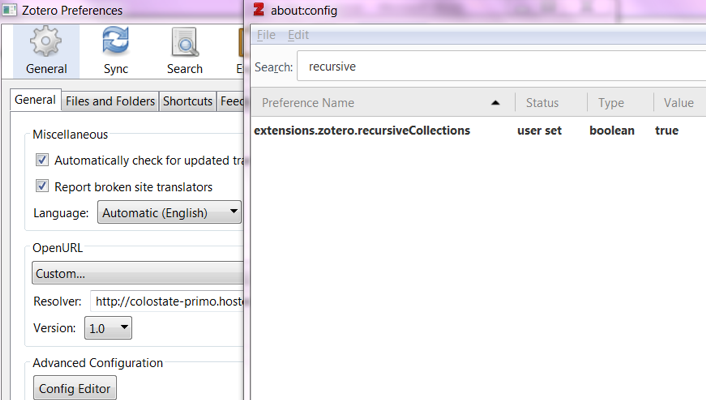
Recursive folders
If you’re like me, you like it so that selecting a collection folder will show all the references in that folder and all sub folders. This is not the default for Zotero, and can be easily changed by the following steps:
- Open Zotero Preferences
- Go to the “Advanced” tab
- Click Config Editor (it may give you a warning, just ignore it)
- Search for “recursive” in the search bar
- Change extensions.zotero.recursiveCollections so that Value = true (double click on the word “false”)
Searches
There are many ways of searching your Zotero library. It’s worth reading through the search documentation to get a sense of what’s possible.
Open URL
Consider setting up an OpenURL resolver to help identify references with the “Lookup” button. This can be very useful, especially if your institution or organization has a library that gives you access to journals. Here are instructions.
Deleting PubMed entries
Some journals, such as Science automatically download a PubMed metadata attachment to the reference. This can be annoying because it will seem like the reference has a PDF attached, when in fact it’s just the PubMed entry.
I suggest creating a saved search which will identify any references with a PubMed attachment. Once it’s set up, simply check the search once in a while, and delete the PubMed entries. Here are instructions.
Groups
Groups are incredibly useful when working with collaborators. A couple of notes about groups:
- Each of your group libraries is distinct from each other and from your personal library
- You can easily drag references from one group to the other
- If you followed the setup in this tutorial, your library PDFs will be stored and synced in your cloud service. However, your group PDFs will be synced on Zotero’s cloud, which gives you 300 MB for free, and larger storage plans for an annual fee.
Happy Researching!
 Stephen Chignell received an M.S. in Watershed Science from Colorado State University in 2017. His master's research focused on water issues in Ethiopia, where he analyzed links among urban growth, hydropower, and large-scale land acquisitions, and conducted baseline mapping of the country's unique alpine wetlands. Recently, Stephen has contributed spatial analysis and training to the Secondary Cities Initiative, and worked to reconstruct the history of Antarctic science with the McMurdo Dry Valleys Long-Term Ecological Research project. He will be starting a Ph.D. in the Institute for Resources, Environment and Sustainability at the University of British Columbia in 2018. You can find more about Stephen's work or contact him through his ResearchGate page. (Bio photo credit: Josh Darling)