


Zoom Teaching Hints
Intro: Years ago I was tasked to find and easy to use and high-quality video conference platform, and out of the dozen or so that I tested, I picked Zoom. Even though it is a great product, and I still think is the best, it does have limitations. Especially when trying to share a license with many individuals. Just know from the get-go that compromises had to be made. Here is kind of a short Zoom primer. Also, note we are sharing Zoom licenses in “Pods”. Take a second and look at the Zoom schedule for your Pod and work with these folks.
NOTES: Our Zoom1 – Zoom6 license pods are used by multiple classes/instructors. From 8AM-7PM use these licenses for scheduled class use only. If you must test please do so after 7PM or before 8AM. Also do not make any back-end changes to the Zoom settings, contact Jonathan if you think these settings should be changed.
THE ZOOM EXPERIENCE: (from a student perspective)
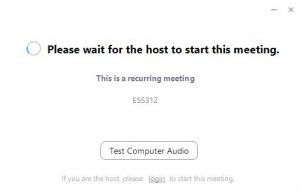 Students do not need their own Zoom login account and please do not share the host login information with them. This will be a little different than in the past. Students can start their Zoom session by clicking on the Zoom link, or by starting the Zoom app and inputting the 10 digit meeting ID number. For first time participants, I recommend clicking on the Zoom link because this will install the Zoom app automatically, (this takes 2-3 minutes). Instead of being admitted directly to the video conference they will see a the “Please wait for the host to start this meeting.” window to the right. This prevents “over-eager” students from tying up the Zoom license. Once the host, the instructor, logs into the Zoom session they will be admitted to the class. Students “arriving” late will also be able to join the session without the host having to admit them to the class. This will help avoid interruptions. During sections of the class where you are lecturing please ask that they mute their microphones to avoid feedback.
THE ZOOM EXPERIENCE: (from an instructors perspective)
In order to start a class, instructors will need to start their Zoom App and then “Sign In” to the Zoom session. Then they will need to input their 10 digit meeting ID. Have your classroom link and meeting ID available so you don’t have to scramble for this at the last moment. This will make the instructor the “host” of the meeting which will give you more control over the meeting any many more options (Breakout rooms, taking over presentations, etc.). Also, note there can only be one “host” per meeting. Because we are sharing Zoom licenses please be aware of classes that might be before or after your assigned time slot, so we don’t overrun those classroom sessions. When you are done close the session by clicking on the “Leave the meeting for everyone” and then remember to log out.
Once a class is started you can choose to record your Zoom session by clicking on the record button at the bottom. See more information about recording below. In the past we set up recording to happen automatically, you will have to do this manually for each class now.
Zoom In-Meeting Controls (Zoom website) https://support.zoom.us/hc/en-us/articles/360021921032-In-Meeting-Controls
RECORDING YOUR LIVE ZOOM CLASS
With 20 classes happening per week it would be difficult for the IT staff to manage and edit all those recordings, so we having to set this up in a self-service mode. If you do plan on recording your live classroom sessions, plan ahead. Know how you want to record your session, how you are going to distribute your recorded sessions, and most importantly tell you, students, what to expect and be as consistent as possible. Depending on how much video (vs audio or presentations) you have on your screen and the quality of your video recording the size of your recording will vary in size greatly. Plan on 200 to 800 MB per recording. Remember while it is nice to record every classroom session, do it with purpose, and let your students know what to expect. It can also consume a fair bit of time, especially as we learning how to do this.
Record Zoom session to your local computer: When you log in to your class as a host you can choose to record your Zoom session to your local computer. Remember you will need to do this each time. After your class is over Zoom will process your recording and you can save it directly to your hard drive. Make sure that you have enough hard drive space available. The processing time varies with the video content and the length of the recording. For an hour class expect at least 15 minutes of processing time for your recording. You can do other actives during this time but do not shut down or log off your computer until processing is completed. If your class is 2 or 3 hours video processing can take a significant amount of time. Plan for this time, especially if you have multiple classes close together.
Record Zoom sessions to the Zoom cloud: When you log in to your class as a host you can choose to record your Zoom session to the Zoom cloud. Remember you will need to do this each time. The biggest limitation of recording to the Zoom cloud is storage space. There is simply not enough space with each license to record and save all the classes throughout the semester and because each license could be shared between 3-4 classes it can be a little tight….. we can make this work, but this will require us to work together. Once your class is finished you would exit and log out as normal. Zoom will then process your class in the background.
If your plan to regularly record classes, I will add you to the mailing list for that class. You will then get an email when your recording is available to download. Unfortunately, you will also receive email recording notifications for every other class in your pod… and maybe a few other administrative emails as well. I don’t think these will be overwhelming, you just need to worry about your class recordings. DO NOT share the link for your class recording with your students, this link will disappear when we need to remove that recording to make space for others. You will need to download your videos in a timely fashion, preferably the same day. A lot of this will depend on how many of your fellow pod members are also recording their meetings to the cloud. Work with them and us.
PRERECORDING YOU CLASSROOM LECTURES
This has been a discussion on campus for a while. But here is a lightly tested recommendation. Sign-up for your own private free Zoom license. Then start up your personal Zoom meeting by yourself and record your lecture.…. While the free personal Zoom license only limits “one to many” meetings to 40 minutes so you should be able to record your class when you are on just by yourself. Just remember that it will take a bit to process the recording after you finish and it will only look as good as the camera you have available.
There are also notes on ACNS site on using Teams to record meetings (or lessons) and then posting them to Canvas. (https://www.acns.colostate.edu/microsoft-teams/)
MAKING RECORDED CLASSES AVAILABLE TO STUDENTS
At this time the University recommends that you upload your video lectures to Microsoft Stream, and copying the “Stream” stream link and putting that link into Canvas (Your Streams username is CSUeID@colostate.edu). Instructions on how to do this are found at the following link, look for the “Upload existing videos” section. https://canvas.colostate.edu/keepteaching/keep-teaching-do-it-yourself/#deliverlectures
Upload existing videos (from ACNS website)
EDITING VIDEOS & MAKING VIDEOS SMALLER
If you want to take the next step and edit your videos here are some recommendations.
MACS: I do believe that most Mac’s have a good and easy to video software included.
PC: There are many free options for windows, but many will include watermarks and have length limitations… I use a free, “demo” version of VSDC video editor. There is a bit of learning curve but you can master basic video editing fairly quickly. And even in the demo mode is quick feature-rich. http://www.videosoftdev.com/
Making videos smaller: There are many applications to do this, but one that is free (Open source license) easy to use and relatively fast is Handbrake ( https://handbrake.fr/ ). Once installed here are simple instructions. Open Handbrake; Select “File Open a single video file” and pick the video to convert, Make sure that in the menu (in the middle) under “Summary” in the “Format” area, select “MP4”, “Web Optimized” and “Align A/V Start”; Under “Presets” select (in the General Area) “Very Fast 720p30”; Then click on “Start Encode”. This can reduce video size by 80% but will take about the same amount of time to convert as the video is long (60 minute video will take about 60 minutes to convert). It will also spike CPU usage so make sure your computer is on a flat solid surface with ventilation around it. You can do other simple activities while the conversion is happening, but I would not start any complex like ARC, R scripts, or models.
JOINING A ZOOM MEETING BY PHONE
Participants can also join Zoom meetings by phone (if they don’t have internet). Because of increase Zoom usage, they have been experiencing some issues with this. Because of this issue encourage them to the Zoom application “computer audio”, but hand this information out where you see appropriate. These are not Free phone calls, unless you live those areas.
Dial by your location
+1 346 248 7799 US (Houston)
+1 669 900 6833 US (San Jose)
+1 312 626 6799 US (Chicago)
+1 646 558 8656 US (New York)
+1 253 215 8782 US
+1 301 715 8592 US
Meeting ID: You will need your 6-10 digit Zoom meeting ID.
Find your local number (international): https://zoom.us/u/adIt33Zik
HINTS FROM OTHERS
- 3-26-2020 FOR WINDOWS 10 “DRIVER ISSUES”: Many updates get loaded and do not require a reboot per say…. But they can cause weird computer functional issues….. I’ve seen updates affect pulse secure, video drivers, Bluetooth devices….. When your suddenly have issues, even though the computer was working fine previously or haven’t run active updates, it’s time for a reboot. Rebooting gets all the drivers on the same page…. This has resolved the majority of “device” issues that people are having in windows 10.
- 3-24-2020 I did a ~21 minute video today on Zoom. Recorded to the cloud, then downloaded. It was 374mb… a mix of video and screen share. I trimmed it down and resampled with editing software, it went to 17 minutes and 100mb. I posted directly to Canvas and it can be easily viewed right from Canvas.
- 3-23-2020 Zoom audio and the laptop audio would randomly become muted about 5 minutes into a zoom meeting for me. After much troubleshooting, it seemed like it was interference with either my Bluetooth keyboard or my USB connected mouse. After I uninstalled and reinstalled those drivers, shut off and on the laptop, it started working again.
- Sit further from the camera so you’re not so big… Keep sharing your screen because maybe a slide is better to look at than a giant face. (This person obviously has a problem with giant faces- JS).